This is the second part of my three part series on installing an Xtrons head unit into my car. In this article I go over the pin-outs of everything on the back side of the Xtrons unit. I also make sure there are no conflicts between the cars existing wiring and the Xtrons head unit.
This article covers the questions I wanted answers to when I did my install. I am neither an Xtrons nor Audi expert. However I have gone down the rabbit hole on this specific Xtrons model and the wiring in my car.
I drive a 2007 Audi A4 B7 sedan with a Symphony II non-Bose head unit. The wiring in my car is set up for a satellite receiver module. It was not included when I bought the car, but I was able to get a used one and installed it myself. Unfortunately the satellite radio does not work with the new head unit. The model of Xtrons head unit I bought is an IB70AA4R. Xtrons says this model is designed specifically for the A4 and is plug and play.
As always I’ve done a video that covers the same subject. If you prefer to watch instead of read then watch it using the viewer above or head over to Youtube.
Overview of connectors
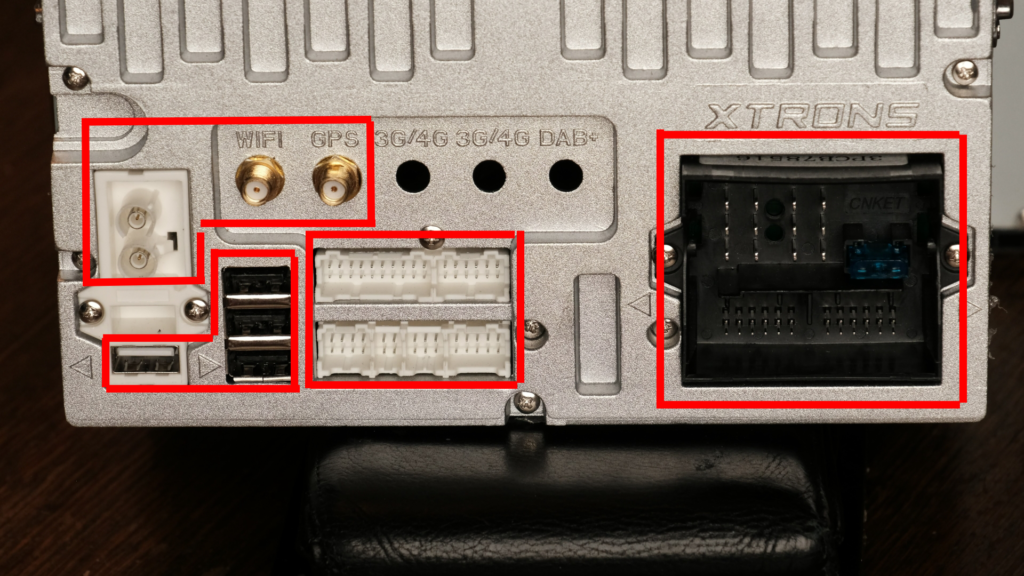
The back of the head unit has 4 main sections and I’ll go over each of these below. There are also some phantom locations that aren’t used on this head unit. My assumption is that Xtrons uses this body for many different models of radio and options are different based on car make/model and head unit.
- Antenna connections
- USB ports
- Xtrons expansion block
- Quadlock
Antenna Connections
The Xtrons has the exact same connector as the Symphony II. So no issues there.
Both the Wifi and GPS antenna use SMC connectors. They are clearly labelled on the Xtrons unit so its hard to mix them up. I mounted my Wifi antenna on the passenger side of the front windshield near the roof line. My GPS antenna is on the dash near the windshield in the center of the car. The cables included with the antennae are long enough for these locations, and mounting them on glass allows for better reception.
USB Ports
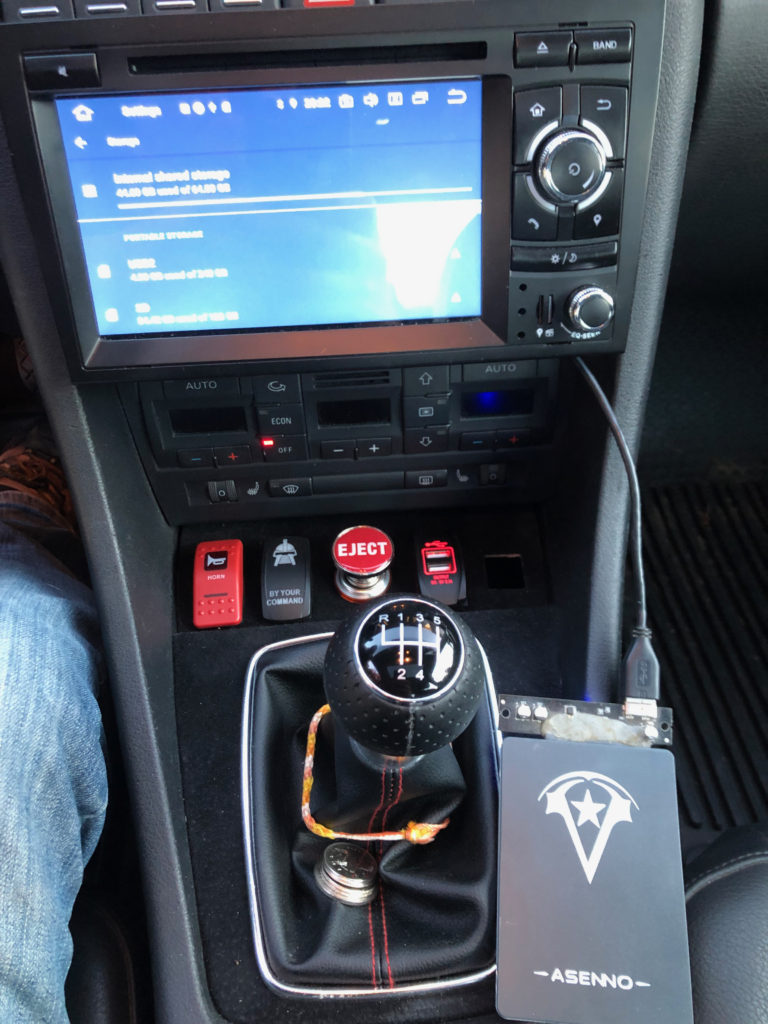
There are four USB 2.0 ports. They can all be used for supplying power for charging devices as well as data communication with a cell phone. They can also be used for memory expansion. I connected a 256 GB SSD drive and Android recognized the drive, and I was able to play music from it.
Android has several dongles that they sell that increase functionality of the head unit. They have,
- 3/4G dongle,
- HiDef FM radio dongle,
- Apple Air Play dongle.
Head over to the Xtrons website to find out all the available expansion options available for the USB ports.
I did research into the DAB radio and 3/4G cell dongles and found that neither work in the North American market, So that kind of sucks. However a cell workaround can be done by using a USB port to plug into a phone that is stored in the glove box. Then set that phone to share internet over Wifi and have the Xtrons connect to that network. Not as slick as a built in solution but it would work.
Xtrons Expansion Pins
In the center of the unit there are some proprietary pins that Xtrons uses for various expansion and feature options. These are broken down into ports labelled A through F. But Xtrons does not provide any functionality on ports E and F for this model.
The 20 pin connector A has connections for,
- RCA line outputs for front, rear and sub woofer signal to send to 3rd party amplifiers
- Two RCA video outputs for remote monitors, mounted in the head rest for instance.
- An auxiliary video with stereo audio In inputs
- A Front dash cam input
- And a plethora of Grounds for all the associated connections just listed
The 12 pin B connector
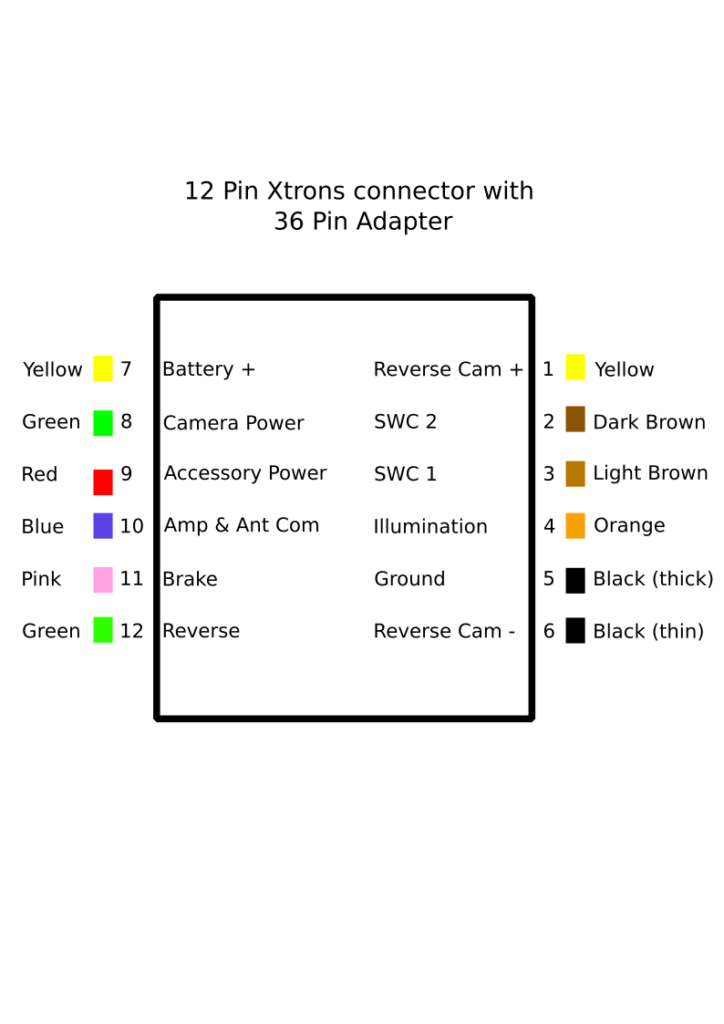
Xtrons includes two 12 pin adapters with this unit. One to use with the 40 pin Quadlock and one for the 36 pin connector if your car uses a Symphony I head unit. They’re almost exactly the same and provide for the same functionality. I’m only going to cover the one that gets used with the Quadlock as that’s what’s on my car. This connector is used to wire in the following,
- Reverse Cam
- There is a Signal to turn on a remote amplifier or to extend a retractable antenna.
- A connection to pick up a signal from the emergency brake
- And for when reverse gear is selected.
- For cars without a CANbus network SWC 1 & 2 are analog inputs that receive signals from the Steering wheel controls. For instance, volume or to select new media.
- And there is one labelled Illumi – This is used to control the head unit front LED illumination, dimming it when headlights are turned on to reduce glare at night.
The 8 pin connector C is labelled for CANBUS
No adapter was included for this port with my radio but I do plan to track one down and see if the Entertainment CANbus network can be accessed from this location. I’ve already built the CANbus decoding tool. It slices, dices and has toggle switches for connecting to all three CANbus networks present on an A4 B7. To build one for yourself check out the series of videos from Adam Varga. He is way smarter than I am and deserves full credit for his hard work designing the hardware, python code, and putting together videos that even I could follow along with.
The 4 pin D connector
The last usable connector is the 4 pin D connector to use with a remote microphone. If you don’t want to install the remote mic the radio will use the front facing one by default. Xtrons detect when the remote mic is plugged in and will then automatically use it instead.
Quadlock aka ISO Quadlock
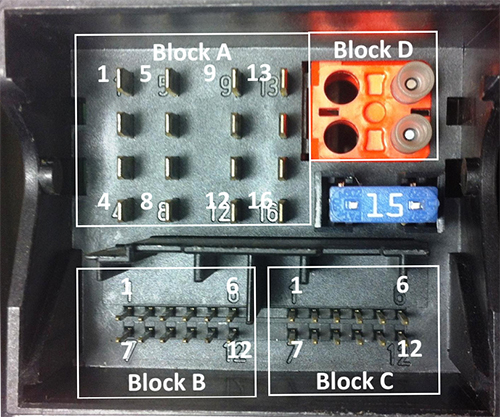
The Quadlock has 4 sections labelled 1, B, C, & D. The D section is not used on my car. Section A breaks down into two 8 pin sections.
Block A
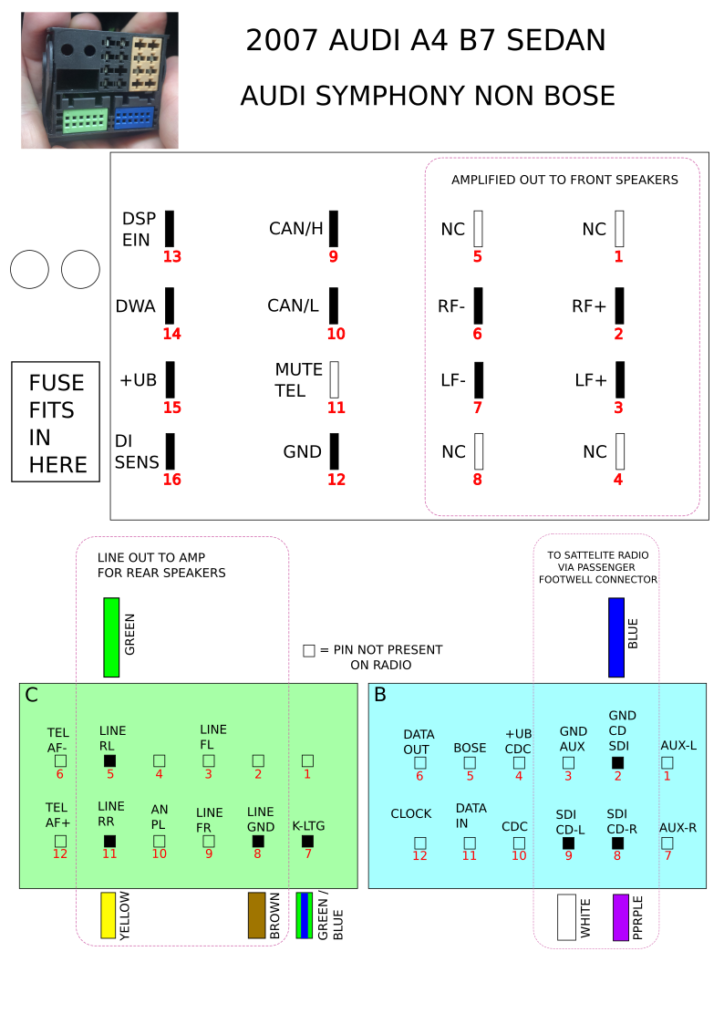
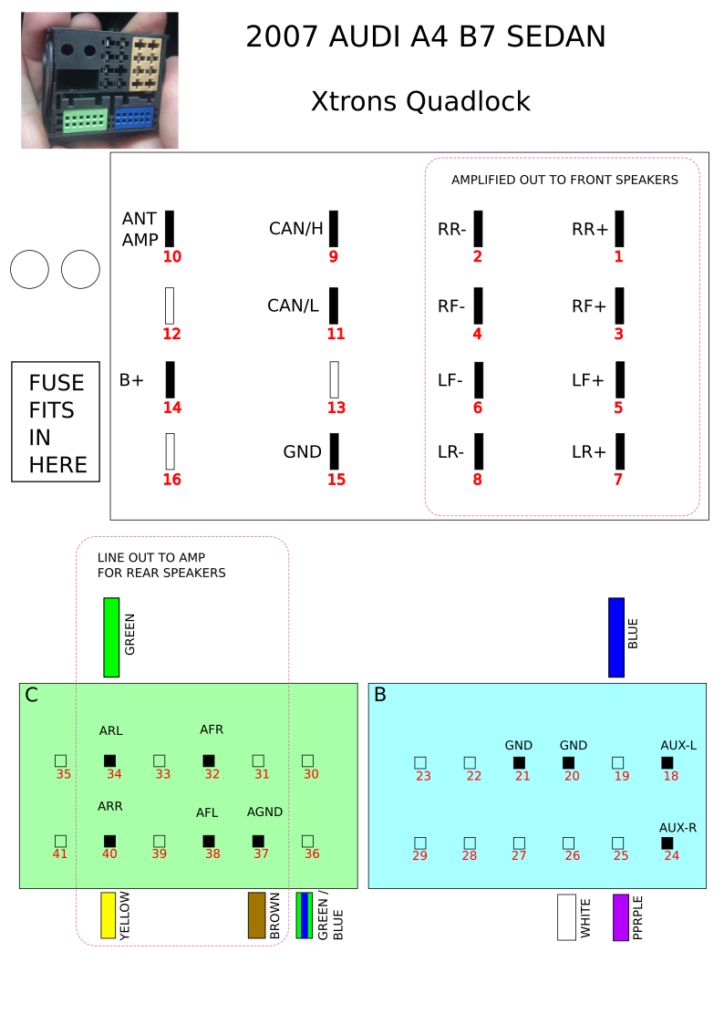
In Block A, pins 1 through 8 are for amplified audio signals sent to front and rear speakers. My B7 only uses the outputs for the front speakers. And the Symphony II does not power the pins for the rear amplified speakers. Interestingly, Xtrons does provide amplified signals for both front and rear speakers on these pins. The B7 doesn’t have wires connected to the Quadlock in those locations, so there is no conflict on those pins
Pins 9 through 16 are used for,
- Battery and Accessory power and Ground,
- CANbus network connections
- Sending a signal to turn on the rear amplifier
- A Telephone mute pin
- And an alarm connection
The Xtrons does not use the mute or alarm pins, nor does it use the Battery power connection, accepting only Switched Accessory power. So no conflicts on those 8 pins. Because the Battery power is not used on the Xtrons it means that in order to get the head unit to power on the key must be in the Accessory position. The Symphony II could be turned on by pressing the “power” button even with the keys out of the ignition, and the radio would then shut down automatically an hour later.
The two diagrams below show which pins are used by each head unit. If a pin is coloured in black then it’s used. If its hollow then no signal is present or used. The Block B and C areas also show which wires are present on my car. Yours may be different.
Block B
Block B can have a few functions depending on the original specifications of the car. My car didn’t have the remote CD changer or a Bose system so those wires are not present. I do have a Satellite receiver in the trunk so those wires are terminated on block B. However Xtrons does not use those pins for anything so there are no conflicts in section B
Block C
Block C has wires for the,
- K line network.
- and Line Level signal and a ground wire for rear amplifier
The car doesn’t have wires connected for the Line level front pins. But I did test both units and they both generate line level signals for front and rear speakers. In case you want to use your own 3rd party amplifier for the whole system. Because no wires exist for the front signals there is no conflict on these pins.
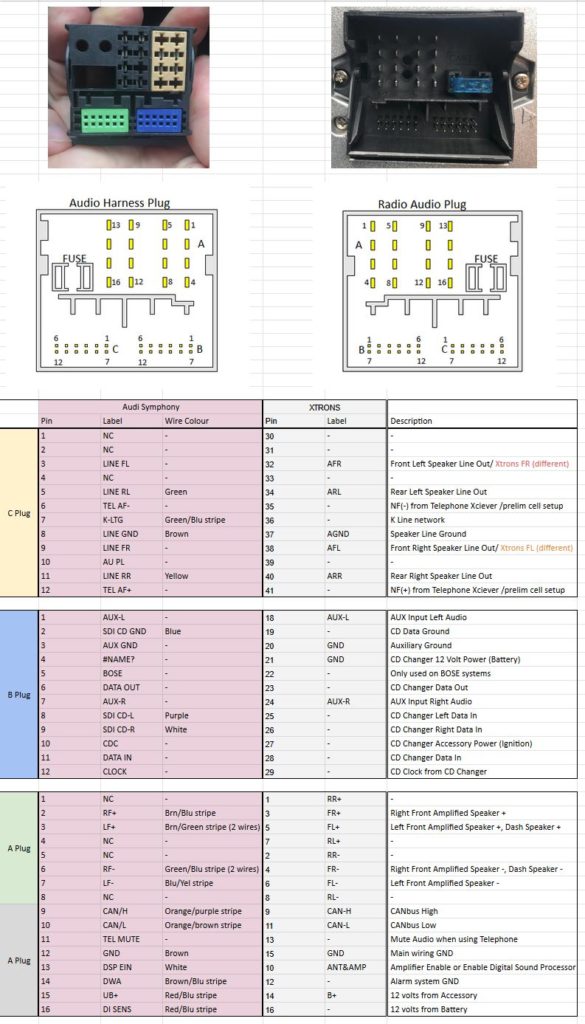
Here is a spreadsheet showing how all the pins on the Quadlock line up between the two head units.
Here are some links to references for a few of the connectors
Summary
All my efforts tracing out the wires in the car and identifying the signals the head units produce confirmed that the Xtrons radio is indeed plug and play on my car. The Satellite radio module located in my trunk won’t function with the Xtrons, but I haven’t used that subscription for around 8 years. As the Xtrons doesn’t use the pins that the satellite module used to use meant I didn’t have to pull those pins out of the B block making for a tidier install.
My next blog post/Youtube video will be on setting up the Xtrons to properly interface with the B7. Allowing it to receive and react to signals from the steering wheel controls, headlights, and reverse switch.




Add comment